- select the New Record
 button on the Main Toolbar
 - or select from the menu Record > New
- or use the Keyboard shortcut ⌘ + ([Command] + [Shift] + [+/=])
- or use the Windows Keyboard shortcut ([Control] [Shift] [N])
Please see our video tutorial at: Transactions: Creating an Invoice
All Transactions are entered in the same manner. Follow the basic steps for entering Invoice Transactions below and click the All Transactions link to find additional information about entering all other Transactions in Artsystems Pro.
- select the New Record
button on the Main Toolbar
- or select from the menu Record > New
- or use the Keyboard shortcut ⌘ + ([Command] + [Shift] + [+/=])
- or use the Windows Keyboard shortcut ([Control] [Shift] [N])
- Utilize the Search field to help find the appropriate Sold To Contact.
- When the correct Contact is found, highlight the name and click the Arrow
button.
- The Contact address will then appear in the Sold To field.
- When the Ship To address is not the same as the Sold To address, follow the same steps above to add the name for the Ship To fields.
- If the desired Contact is not found in the list click the Add New
button to add a new Contact.
- To remove an incorrect Sold To or Ship To selection, click the Remove
button.
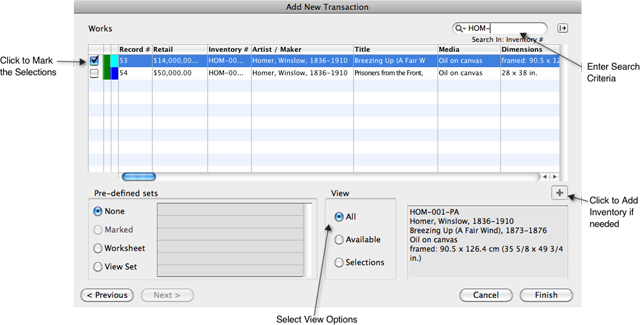
- Utilize the Search field to find the Works:
- Utilize the View Options:

- Click the All button to display all Work records.
- Click the Available button to display only available Work records.
- Click the Selections button to display all Work records presently selected.
NOTE: Work records may be entered on this screen if needed, click the Add
button to add new inventory.
- Sort records on the grid: Click the Field Header to sort records by that particular field.
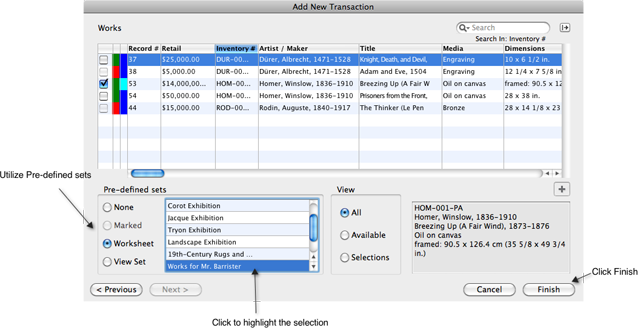
- Utilize the Pre-defined Sets:

- Marked: Prior to opening the Transactions Module, open the Works Module and mark all the items for any one particular transaction. Then open the Transactions Module and create the new transaction record. In the Transaction Wizard, on the Work Selection Screen, select the Marked option under Pre-defined sets. All Works that were previously Marked in the Works Module will appear Marked in the Work Grid.
- Worksheet: Click Worksheet and all saved Worksheets appear in the list of Pre-defined sets. Select the saved Worksheet name and only Works in that Worksheet will appear in the Works Grid. Mark the Works for the transaction.
- View Sheet: Click View Set and all saved View Sets appear in the list of Pre-defined sets. Select the saved View Set name and only Works in that View Set will appear in the Works Grid. Mark the Works for the transaction.
NOTE: Quick tip--to Mark All Works on a saved Worksheet or View Set, use the Marking Tool on the Main Toolbar. See Basics>Main Toolbar
NOTE: When Invoice and Cash Sale transactions are created, updates will be made on the following fields in the Works Module: Status (status color will change from green to red in the Work Detail>Inventory Number field); Current Owner and Current Owner Dates will display the new owner (on the Work Detail>Provenance Screen); Sold To, Sales Date, and Sales Price will update appropriately (on the Work Detail>Financial Screen).
To keep track of inventory locations, click the Shipped field when the artwork in a transaction leaves the premises.
 tool to Convert the Transaction record to a separate Shipment transaction. Click Shipped on the Shipment transaction when the artwork leaves the premises.
NOTE: When Shipped has been checked on a Transaction record, the record is then locked for editing after the transaction is Saved and Closed. If additional edits are required on the Transaction, users will need to click the Lock icon to unlock the transaction upon re-opening it.