Documents
The Document button is a tool to help create word processed documents for a record such as; the Infosheet in the Works Module, a letter or fax in the Contacts Module, and in the Transactions Module any (Invoice, Consignment, Offer, etc). The document can be printed, saved as a separate file on the workstation, or saved within Artsystems Pro (for easy access). Users can also link additional support documentation to records (in various formats: doc, docx, pdf, or jpg files) by dragging and dropping into the Document screen.
To Generate A Document
From the Main Toolbar, click the Document  drop-down menu to select a document report to generate. NOTE: Document selections are only available for Works, Contacts, and Transactions).
- Works: Infosheet: The Infosheet is a fact sheet about the artwork that includes Work details, Provenance, Exhibition and Bibliographic information.
NOTE: Provenance information is added in the Work Detail on the Provenance screen. Exhibition and Bibliographic information is linked to Works from the Reference Module on the Works Detail>References screen.
- Contacts: Fax or Letter: Create a Fax or Letter which includes the Contact's information.
- Transactions: Transaction Document: Generate a corresponding Transaction document for each type of Transaction (i.e. Invoice, Consignment, Offer, Exhibition, Loan, etc.)
All Documents are generated and printed in the same manner. Instructions on how to generate and print a Transaction Document can be found: Reports>Printing a Transaction Document
Save Frequently Used Text/Graphics in Documents (formerly Glossary in GalleryPro)
- To save customized text or images (such as logos or boilerplate text) you have added to your Document for future use, before closing the Document, follow the steps below for the version of Word you have installed.
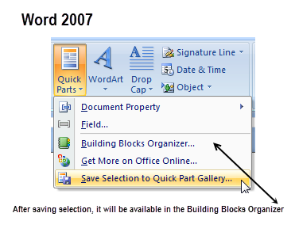
- In Microsoft Word for Windows 2007, 2010 and 2013, use the Quick Parts feature from the Insert menu. After highlighting the text or image in your Document, choose Insert>Quick Parts>Save Selection to Quick Part Gallery>enter the criteria and click OK to save it. The saved text or image will now be accessible from Insert>Quick Parts>Building Blocks Organizer.

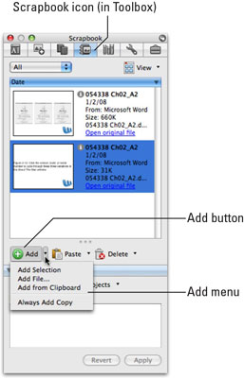
- In Microsoft Word for Mac 2011, use the Scrapbook feature. Highlight the text or image in your Document>select the Toolbox icon>select the Scrapbook icon. Then, you can either drag it onto the Scrapbook or click the Add button and choose Add Selection from the drop-down menu.
NOTE: Scrapbook in not included in Word for Mac 2016. The Auto Text feature may prove useful as a replacement. Under the Insert menu click on Auto Text.

To Activate Saved Documents
- Click the Document button on the toolbar to activate the Open Document Screen. NOTE: You can edit the Description column at any time by clicking twice in the field to activate edit mode.
- On the Open Document Screen, highlight the desired document then click Open.

Or, saved documents can also be activated using the Document  drop-down:
- Click the Document
 drop-down menu
- Highlight the desired document and click once to open the document (NOTE: Saved documents appear with the Edit-Document
 icon)
icon)

To Add Additional Support Documents To A Record
- Open the Apple Finder to locate the folder where the desired file is saved
- Click the Document button on the Main Toolbar to activate the Open Document Screen
- Position the Apple Finder next to the Open Document Screen
- Click and drag the desired file into the Open Document Screen

To Delete Saved Documents
- Click the Document button on the Main Toolbar to activate the Open Document Screen
- On the Open Document Screen, highlight the desired document then click the Delete
 button.

- Answer Yes to the prompt:


 drop-down menu to select a document report to generate.
 button to view all documents linked with the record or to link additional documents with the record.


 button.
